03 July, 2011

Crochet Bunny


 Somehow this post got lost as draft in my archive... Can't explain how this could happen. However, I hope you like it nevertheless.

A friend of mine had a little baby girl some time ago and I took this chance to design this cute crochet bunny for her. I wanted to make something pretty without being too girly, and I'm pretty pleased with this one. :-) Even though little Miss P. is still to young to decide if she likes it, her mommy does. 
I could write a pattern if there's a demand. Just let me know! I used Drops Paris and a 5mm hook.

23 June, 2011

green, green, greeeeeeeennnn....

I just realised that all my latest projects are green! hm, seems like I've got a crush on this colour recently. :-/ Ok, need to change colour for next projects!

Public Transportation Crochet


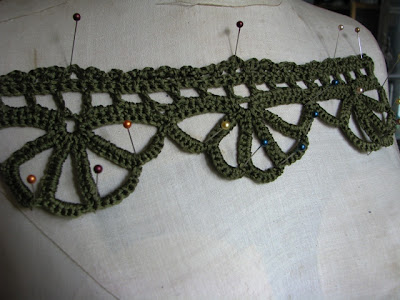
I had the pleasure to test this lovely pattern for Heather on ravelry. It was a nice little project that kept me busy while sitting in the bus on my daily trip to the city/university. It's fun and pretty easy and perfect to use some left yarn from other projects. Mine is worked in DROPS Cotton Viscose but you could take any yarn you have at hand as long as the gauge matches.
I didn't wear it yet because I usually don't wear such things arround my neck, but I'm thinking of using it in a different kind of way, maybe as a bag decoration or something... We'll see.
Find my ravelry project page here


Still alive and kickin' II


Hello my dear readers! Did you miss me? I was very quiet for quite a while now.. Life was so busy, I tell ya'! Mainly because of the end-semester-exams and other uni stuff. But also because of family and friends, real life stuff. ;-) BUT... I wasn't lazy at all and I'll show you some of my projects the next days, I promise!
I the meantime you can enjoy this picture I took on a botanical field trip end april/beginning mai. There were fields and fields of wild garlic blooming in the forest and they were so beautiful! Imagine a peaceful spring morning, birds singing in the trees, the sunlight falling down through the light green leaves and the smell... Oh yeah, the smell. I was overwhelming!

29 April, 2011

Spring Shrug - First attempt in pattern design


As some of you may already know, I taught myself how to knit some months ago and now made my first self designed piece! I made it for a swap on Craftster and it's now living in Sweden with my lovely swap partner Maria. It was quite a challenge to design, plan, and finally make this shrug, but I managed without ripping it, yay! :-)
I'm currently working on a second shrug for myself, made of a different material, and plotting and improving the pattern. I'm thinking about posting it here and on ravelry as soon as it's finished. What do you think? Would you like to get this pattern? It would be a one size fits most, big enough because I'm a big girl, but easy to make smaller for people with intermediate knitting skills.


26 April, 2011

Afternoon Tea Fingerless Gloves - lacy and victorian inspired


I made these a while ago but couldn't post them because they were a gift and I wouldn't spoil the surprise. They were so easy and so much fun to make! I guess I have to make some more in differen colours for myself. :-P The pattern can be found here


24 April, 2011

Soap Saver on a Budget


I have all this cotton yarn scraps around and finally decided to turn some of them into something useful. Crochet soap savers are easy as pie and fun to make, and they're a perfect public transport project. I made this one in the bus on my way to university.

You'll need:
Cotton yarn
Matching hook

Chain 6, then slip stitch to form a loop. ch1, then sc6 into loop, slip stitch to finish round, ch1, 2 sc in every sc until you have to slip stitch to finish round. Continue until you reach preferred size, slip stitch and fasten off. Attach tread to center and chain about 30 to 40, attach chain to center again, that's your loop.
ET VOILA, here's your brand new soap saver!

Note: you can make it multi coloured if you use different yarns, or you can create different textures. You could even make a spa scrubby with a nice peeling effect...

05 April, 2011

Still alive and kickin'

Life was a bit crazy the last days and there were too many other tasks to deal with.. And no time for blogging or crafting. That's maybe why I decided that it was time for a little something for myself. A girl needs a treat every now and then!


Some flowers and "Alys' Küchengarten" - Original: The Edible Garden
I love Alys Fowler's books. I already have one and it's a pleasure to read it. And Alys shares so many good ideas for small gardens, rich crops and how to have all that on a budget.

BTW: I have some new projects going on and I'll tell you about them soon! ;-)

24 March, 2011

Chamomile-Peppermint Soap


Here's my lates batch of soap: chamomile-peppermint soap.

500 gr chamomile oil
400 gr sunflower margarine
350 gr coconut oil
300 gr palm oil
300 gr sunflower oil
100 gr ricinus oil
  80 gr beeswax
650 gr chamomile tea
270 gr NaOH
Peppermint leaves, chamomile flowers, peppermint oil

Prepare the chamomile oil some weeks in advance. Add 550 gr olive oil to a glass jar and fill it with 100 gr chamomile flowers. Let it sit for 4 to 6 weeks in a warm place. Then filter it and put 500 gr aside for your soap. You can use the rest as massage oil.

Add some ground chamomile flowers to two tablespoons of your chamomile oil and let sit for at least two hours. Prepare chamomile tea, filter and let cool down.

Make the lye: Add the NaOH to your chamomile tea (NOTE: Do this outside! Always wear gloves and glasses. ALWAYS add NaOH to the liquid and NEVER EVER do it vice versa!) Your tea will change colour and smell strange, but that's ok. Let the lye cool down.


Melt all the hard fat components in a pot and then add the liquid oils. Let cool down to 45 degress Celsius. Add the lye slowly and mix constantly. Now you want your raw soap to thicken slightly. This works best with a hand blender. When you have a consistence like hot vanilla pudding, add the oil-chamomile mixture. 
Pour about 2/3 of your mixture in your soap mold and mix the rest with ground peppermint leaves and peppermint oil. Pour it in the soap mold, too. Cover soap mold and isolate it well. Let cool down 24 hours, cut and let age for 4-6 weeks.


Here you can see the gel phase very well: note the change of colour on the surface


22 March, 2011

Making Apfelrösti

Apfelrösti is a Swiss dish made of bread and apples. I think it's a traditional dish to use up stale bread and apples that don't look nice anymore. As the case may be, it's yummy, simple and you can make it from odds and ends you already have at home.


You'll need:
250 gr. bread, cut in thin slices and bits
1 tablespoon butter
3 apples, cut in slices
1 dl applejuice
salt, pepper, cinnamon

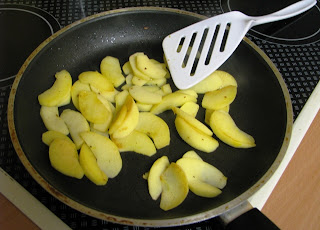
Melt butter in a skillet and roast bread until golden brown. Put it aside. Melt some more butter and roast the apple slices for 5 minutes. Add the bread and roast together for some more minutes. Add apple juice and let cook until all liquid is gone. Add salt, peeper and cinnamon after your taste. You can keep this warm in the oven for at least half an hour.


This recipe makes a side dish for two persons. We usually have it with some kind of cheese steak, called Landsgmend-Steak.

20 March, 2011

Fiber Club: Part 3


 This is my third and last club package from zebisis designs. I'm happy with everything I got and I would recomend this to all my fellow spinners if Maysha hosts an other round. Great products and fair prices!
This time I got a 1.31 oz. green sea sediment top whorl with rosewood shaft and gold hook. I especially like the carving of the shaft above the whorl. The grey fiber is a bonus gift, 46 gramms carbonized bamboo.
This month's fiber is very special: 3 oz. hand painted milk protein fiber. I didn't even know that this exists.. There's still no time to spin, but I'm very curious about working with this one!

15 March, 2011

Sinfully nutty muffins - gluten free


These muffins don't contain any flour, they are fluffy and yummy and so easy to make. They don't contain a lot of sugar either.

You'll need:

150 gr. butter (melted, cooled down)
  40 gr. sugar
    3 egg yolks
 1/2 vanilla bean
250 gr. sweet chestnut puree (unsweetened)
150 gr. ground haselnuts
    5 egg whites
2 1/2 teaspoons cinnamon (optional, I'm a cinnamon lover)

Mix butter and sugar. Mix all the other ingredients with the butter-sugar mixture (except the egg whites!!).
Beat the egg whites. Mix them CAREFULLY with the other mass. The beaten egg whites will make your muffins light and fluffy, so be sure you don't destroy it's airy texture!
Give the mass in prepared muffin tin and bake for 20-30 minutes on 190 degrees Celsius
Enjoy!

13 March, 2011

The most breathtaking sweet little babies...


Seriously: aren't they sweet? I want to have sheep. And lambs, lots of them. :-P


And mommy's pretty, too

Fiber Club: Part 2


Here's my second fiber club package from zebisis designs. I got a 1.07 oz. poppy jasper top whorl with carved hardwood shaft and gold filled hook. Such a beatuy! Usually, I don't like gold to much. But I think the golden hook matches the stone perfectly. The fiber is merino, bamboo, silk, soy silk and rambouillet carded roving in different shades of green with reddish-brown highlights. Unforetunately, I don't have time to spin because I have other things to do. But I can't wait to get started with this one!

09 March, 2011

Not much to see yet.....


I prepared my seed boxes this week. There's not much to see yet, but I'm positive to find some tiny germ buds soon. I sowed calendula, borage, verbena, morning glory, woodland strawberries, seven different chili breeds, hollyhock, bee balm, and cobaea scandens. I have some more seeds that need to wait til april.
I'm so excited about all those beauties to be! I really hope that the hollyhocks do well, they're one of my favourite plants.
And I found out that some of my herbs, which I was sure they didn't make it through winter, are pullulating! Yay! :D

05 March, 2011

Japanese sewing books rock!

You may think I'm completely nuts... And you may be right!
I bought some japanese sewing books on ebay recently. And I don't speak a single word of japanese! Not to mention that I can't read it. But.. I had to have those books. The desings are so lovely! And, a big plus, japanese sewing books usually have great pictured tutorials. I think I should be able to work with them, even though I have moderate sewing skills. And, I 'll have to adapt the patters. I'm the oposite of a small japanese woman.. But it's ok, I can make that! I think..


Some of my favourite clothes:


Aren't they pretty? And they look so comfy, too!

You see? Pictured tutorials..


And no clue what could be written there..

Spring's almost here!


I'm pretty sure that spring's almost here... :-)


03 March, 2011

Recycled Vintagey Crochet Coverded Candle Holders


May I present my latest recycling attempt: These three crochet glass candle holders.
I had some nice glass containers from a storebought dessert. They were far too nice to go in the regular glass recycling. I knew I had to give them a new life! I was very inspired by several crochet covered things I saw on the net recently and wanted to give it a try. I didn't really use a pattern, I just grabbed my hook and winged as I went along. I'm pretty pleased with the results and will certainly make more. I used cotton yarn and I can't remeber the hook size.


Detail pics: